Documentation overview
Although the ideas behind out DNA barcoding project are fairly simple, find a mushroom, take a sample, and send it for analysis. The execution quickly becomes a lot more complicated if the resulting DNA sequences are to have any value. The following flowchart gives an idea of the procedure and workflow used to go from field specimen to DNA barcode. We also use a checklist to confirm that all the steps up to the actual DNA sampling have been performed before sampling the tissue.

DNA barcoding flowchart
The above process can be broken into steps:
- On finding a suitable specimen in the filed the first pictures are taken and the sample collection sheet is filled out immediately.
- The sample is collected and taken back to base for annotation. You generally want to be somewhere with good light and a table for this step.
-
- Don’t leave the annotation step to the next day as many mushrooms will wilt, dry out or otherwise change during that period and you won’t collect as accurate results.
-
- You can carry out chemical testing if desired at the same time as annotation.
- A DNA barcoding checklist is filled out and if the required information has been collected a tissue sample is taken and applied to a Whatman FTA plantsaver card.
- The specimen is then dried and prepared as a voucher.
- All the data from the forms can be entered into the computer.
- The FTA cards are sent off as a batch for DNA extraction, PCR and sequencing.
- Vouchers are sent to a herbarium in a batch too.
- When the DNA has been returned it is analyzed
- If the DNA sequence is of good quality it is submitted to the GenBank database.
In general we recommend limiting individual specimens to less than 10 per an individual as it can take 10 minutes process each sample and much longer when carrying out more through annotation.
This second diagram models most of the information we collect in the different forms and worksheets and shows the relationship between them. The left hand side of the diagram consists of administration worksheets designed to keep track of the DNA bar coding kits, FTA cards and samples. The right side of the diagram covers the sample sheets and details of the samples themselves.

In all there are approximately 50 pieces of information collected on the location and annotation forms per a sample and even then we can not pretend that the annotation of any species except for Amanitaceae, whose forms are more detailed, is very through.
All the forms and protocols required to carry out the above process are available here either as downloads or links to the original documents. There are parts of the process that are still being written up but the majority of the information is available now. In the future we hope to include some worked examples of the complete process and videos going over the annotation of samples.
Sample sheets
A year into the project we have refined the sample sheets into three levels of annotation. The first level of annotation is the simplest with limited annotation. The General Purpose Description Form is now the recommended form. The documentation requires taking 4 or so pictures of the specimen at different angles along with a simple sheet that records the measurements of the specimen and features that can not be captured in a picture such as odor and taste. The final field is for identifying features or why you think this specimen is a particular species and not something else. This form can be completed in less that 10 minutes.
The second level of annotation forms are based on those from the Interagency Special Status /Sensitive Species Program (ISSSSP), which is part of the Pacific Northwest Regional Office of the U.S. Forest Service and Oregon/Washington State Office of the Bureau of Land Management. The forms were modified slightly so that they all used a common sample collection and chemical test forms. There are multiple different sample description forms depending on the main fungal taxa group:
- Boletes & Polypores
- Cortinarius
- Gilled Basidiomycetes
- Corals
- Non-Gilled Basidiomycetes (Clublike, Chanterelle, Tooth, and Jelly fungi)
- Epigeous Ascomycetes (Elfin Saddles and cups)
- Sequestrate
The advantage of this approach is that only the relevant fields for that taxa are displayed making sure that all the required information is collected without missing anything. These forms are more complex and require the recording of colors and more details about the physical characteristics of the specimens. These forms typically take 15 to 30 minutes per a specimen.
An example of the third and most stringent level of annotation is the form for Amanitaceae. We can optionally annotate an Amanitaceae using a form that collections a lot more detailed information about the specimens. The form was developed by Rod Tulloss and is available on the Amanitaceae website. These forms can take an hour or more to fill out and require a good working knowledge of fungi descriptive terms in both Latin and English.
One problem that was encountered was the time taken to digitization the sample and annotation data on the forms and collect that information into electronic spreadsheets or databases. To that end we developed a web based form. We only need one for all the description sample forms because we can use the answers from questions to determine which fields to display or conditional logic. The form was developed in WordPress using the Gravity Forms plugin.
-
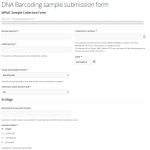
- DNA barcoding submission form
-
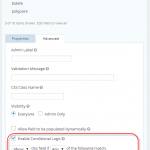
- Using conditional logic to control which fields are displayed.
Originally we used a paper sample collection form but we have simplified the field sample collection procedure and use a combination of a paper form and the DNA Barcoding Assistant application or just the application. The DNA barcoding application runs on iPhones/iPads and Android devices and captures the GPS coordinates and a picture of the sample. There is a tutorial that covers the usage of the application to help get you started. The application was designed to work with BOLD but is suitable for any biological sampling project. In the past simple things like extracting GPS coordinates from electronic maps or photos and converting them from Degrees, Minutes & Seconds to decimal would take a surprisingly long amount of time. The DNA Barcoding Assistant app does this automatically and emails the results in electronic form ready to use with other programs.
We developed a numbering system that would result in unique samples numbers being generated at multiple sites on the same day without the other collectors knowing which numbers were in use at the other sites. Our numbering system looks like this:
WPMC20131220-1-1
WPMCyyyymmdd-k-s
yyyy year
mm month
dd day
k kit number or collector number
s sample number from 1 to x
At the moment the data is stored in spreadsheets before uploading to MyCoPortal or Mushroom Observer. In the future there will be an online database for the club’s samples.
As well as using the customized sample forms from ISSSSP we have our own forms for administration, sample collection, chemical testing and checklists:
- Admin and tracking sheets
- Forms and checklists
Protocols
We used all the documents mentioned in the McIlvainea Making Scientific Vouchers article to help develop the protocols for our project. A lot of work has gone into preparing protocols and guides on what to do. The Halling guide is a good starting point but you may need more detail for some aspects of your project. For Amanita the Amanitaceae website has a document covers some of the specific methods used for Amanita analysis.
We have created a kit that contains all the required paperwork and tools for documenting the specimens – measuring, describing, slicing up and DNA sampling. There are currently four of these kits circulating within the club that can be used by anyone who wishes to sample a specimen.
We currently have three protocols available with more to follow:
There is also a video by Bryn Dentinger that illustrates the sampling of a piece of mushroom and applying it to a card:
http://www.youtube=http://www.youtube.com/watch?v=Gir56iYspTE
A protocol on the DNA analysis is in development.
Documentation
In the DNA barcoding kits we included copies of all the different sample sheets, the protocols, the clubs species life list, check lists and documentation to help with the sample annotation. Some of this documentation is printed and due to the size and number of colored images some is included on a USB key. The USB key also contains copies of all the samples files and checklists in case additional copies are needed.
Sample Annotation
It is easier to identify the mushroom first before annotating it. Recommended guide books include Mushrooms Demystified by David Arora and the National Audubon Society Field Guide to North American Mushrooms by Gary Lincoff. These and many more books can be purchased from our Amazon store. If you wish to carry out more stringent second level of annotation different mushroom groups require different description forms. We use the Introduction to Fungi Identification & Harvesting guide by the Wisconsin Mycological Society as the guide for sample sheet selection and introduction to annotation. The sample description forms are mostly self-explanatory if you are reasonably familiar with fungi biology and some of the Latin descriptive terms. Common descriptive terms with pictorial examples are illustrated in an excellent macro features guide published at Mushroom Observer.
Color documentation
The mushrooms should be viewed under natural light and the colors of various parts recorded. Color descriptions can be quite simple and can be expressed in your own terms. The cap could be red but a better description might be brick red. Different people may have different names for colors depending on the languages they speak and their cultural background, as well as differences in eyesight and genetics. Photographs capture this best, especially if they can be white balanced or otherwise standardized. If you plan on writing down the colors it is much easier to compare the mushrooms to a color reference book. There are two color guides that are in common use within the fungi community that we are familiar with, Methuen Handbook of Colour and Munsell Soil Color Charts. Methuen Handbook of Colour is out of print and is currently selling second hand for about $400 a copy. Munsell Soil Color Charts is available and is good for browns and grays but costs $179. Obviously it is not financially feasible to equip each DNA barcoding kit with copies of these two books. For this project we originally standardized on The Online Auction Color Chart or OAC chart as a reference but this is no longer available. Instead we recommend taking good pictures.
Smell documentation
We use the smell wheel from the Distinct Odors article by Robert M. Hallock and Maura LaBrecque in Fungi Magazine, Volume 6, No. 5.
Software
There are a few computer program scripts and sticker printing template files that were developed for the project. In the long term there will also be a database to store all the results but this is still in development at the time of writing.
Comparing the clubs life list to known ITS barcodes
In the introduction to the clubs DNA barcoding project the second project was defined as comparing the species in the clubs life time identification list against species contained in the public DNA libraries. We can do this in three steps:
- Download all the ITS samples for fungi from one of the public databases, the NCBI Genbank database
- Extract a list of species from the database
- And then compare that list to our club list.
The NCBI website has an interface to GenBank that allows you to select and download subsets of the database. To create a GenBank database of Fungi sequences that contain ITS barcodes we used the following search terms “((“Fungi”[Organism] OR fungi[All Fields]) AND ITS1[All Fields] OR ITS2[All Fields] OR ITS3[All Fields] OR ITS4[All Fields]) AND “fungi”[porgn:__txid4751]”which resulted in this URL (on one line):
http://www.ncbi.nlm.nih.gov/nuccore/?
term=%28%28%22Fungi%22[Organism]+OR+fungi[All+Fields]%29+AND+
ITS1[All+Fields]+OR+ITS2[All+Fields]+OR+ITS3[All+Fields]+OR+ITS4[All+Fields]%29+AND+%22fungi%22[porgn%3A__txid4751]
To downloaded the file go to the “Send to” feature, select file, set the format to GenBank and leave the sort order as the default order. There are faster ways to do this but this is one of the easiest ways.

Create a fungal ITS database – download options.
A simple Perl script, ListSpecies.pl, extracts a list of species from the file. You will need the Perl language installed on your computer to run this script. Before you run the script you will have to set the input file name in the script. You can do this with a good text editor like Notepad++. The script with create an output file, FungiITS_species.txt, containing all the species and also reports how many ITS entries there are for each species.
The FungiITS_species.txt file can then be compared to our club life list with another Perl script, CompareLists.pl. Our club list is in the format of number tab species, for example: 72 Trichaptum biforme. The number is the percentage of walks that Trichaptum biforme has been recorded. If your species list is not in the same format or does not have the same file name as our club list file then you will need to edit the script. After running the script the end result is a text file with a tab delimited list of species, a small sample of which is displayed:
| Species | Percentage of walks species identified | Number of public ITS entries |
| Agaricus arvensis | 14 | 9 |
| Armillaria mellea | 20 | 50 |
| Ischnoderma resinosum | 16 | 0 |
| Ganoderma applanatum | 55 | 10 |
This list is opened in Excel and printed 2 pages per a side and double sided and included in the kit.
Printing stickers and cards
The final script in the software section is used to create the input for the sample number sticker sheets. These should be simple stickers with a unique number. We need multiple stickers with the same number so that we can add it to the label, the voucher, FTA card and paperwork. Only two stickers are need for the field collection, one with a simple sample number and barcode of the number for use with the voucher collection, and one with just the number for the sample collection sheet. We used the Avery sticker sheets No. 08167 for this and the Avery online software. The SampleSheetGenerator.pl script creates a “Sample label template.csv” file ready for the Avery software. This is a very simple script with no user interface, like the others, and the exact parameters used to create the template file need to be edited in the script file itself.
We also use the Avery software to print index cards with a ruler on them. These are the index cards that are used when taking the initial picture of the specimen in the field. You can use this template, WPMC index card, with Avery Printable Index Cards, No. 5388 and the Avery online software to print out three cards per a sheet.
Barcode image generator
Want to create a nice image for your newly sequenced barcode? Try the DNA Barcode Generator from BioRad.
Conclusion
Hopefully there is enough material presented over the three pages, the introduction, DNA barcoding project and this one, to help you set up your own DNA barcoding project. The WPMC project is still under development and there will be updates to this page over the next year or so. As I mentioned previously this is but one way to run such a project. If you have suggestions, comments, corrections or would like to discuss anything presented in these pages please contact Richard Jacob at [email protected]. First published on March 26, 2014. Updated on October 14, 2014.
Recent Comments